-2.png?width=1080&height=1080&name=Untitled%20design%20(5)-2.png "bemo logo")

With 81 percent of data breaches being due to weak, reused, or stolen passwords, turning on Multi-Factor Authentication (MFA) for all of your apps is necessary. In this article, we'll show you how to set up MFA for your Office 365 account paired with the Microsoft Authenticator smartphone app.
While setting up MFA is an essential step, it is only one portion of a five step comprehensive email security strategy. This blog is the 5th post of a 5 post series titled Your Complete Guide to Microsoft Email Security. The 5 steps to email security are:
- Configure DKIM, DMARC, SPF
- Deploy EOP (Exchange Online Protection)
- Set up Office Message Encryption
- Enable Office 365 ATP (Advanced Threat Protection)
- Enable Office 365 MFA with Authenticator App (this post)
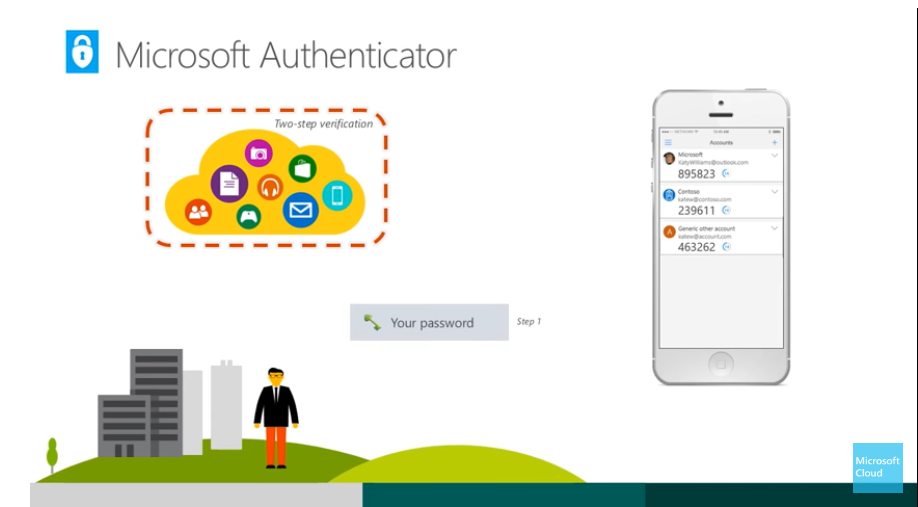
Microsoft Authenticator App
What is MFA? Follow the link to read a quick blog about what MFA is and why you need it.
While you can authenticate by typing in a 6-digit verification code sent to your phone or email address, having to jump back and forth between tabs and apps and then typing out the code is really annoying. The Microsoft Authenticator app alleviates this poor end-user experience. Why use MFA? Click on the picture below for a short video:

Benefits of the Microsoft Authenticator App
- Secure
- Available for iOS and Android devices
- Can approve an MFA request even if you have no cell coverage
- Can approve an MFA request even if you have no wireless coverage
- If you have a limited SMS Plan and have wifi, you will not be using your SMS plan to get authenticated
- The best of all, Microsoft delivers the best MFA experience. You just need to click a button to MFA, no need to read, remember, and type a 6-digit code
Office 365 MFA Step-by-Step Setup
Before we begin, you or your IT administrator must have enabled MFA and the Azure feature called “Users can use preview features for registering and managing security info – enhanced” before being able to follow the steps below.
Let’s get started!
- Go to https://office.com
- Click on Sign in
- Type your username and click Next
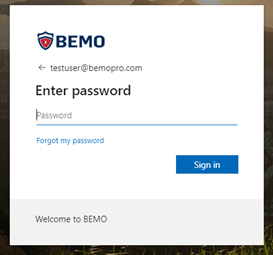
- Type your password and click on Sign in
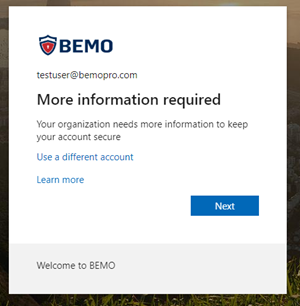
- You will now be required to provide more information and start enrolling your device against your Office 365 account.
- Click Next in the screen below
- Click Next in the screen below
- You will now be presented with a wizard to install the Microsoft Authenticator app on your phone
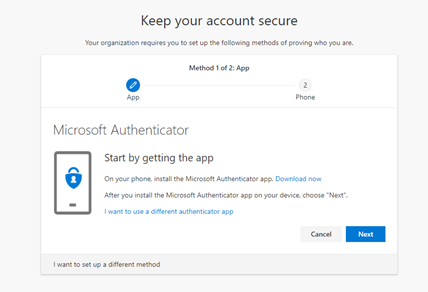
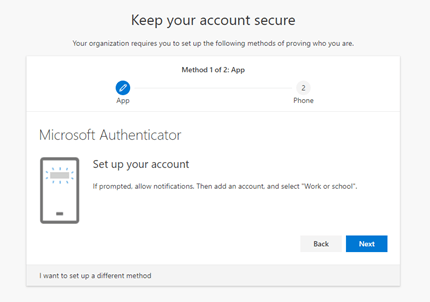
Once you have downloaded the app, please make sure you allow the Microsoft Authenticator app to use your camera (if asked). If the app cannot use the camera, you will not be able to complete the setup correctly. Once the app is installed, you will need to set up your account to connect to the app.
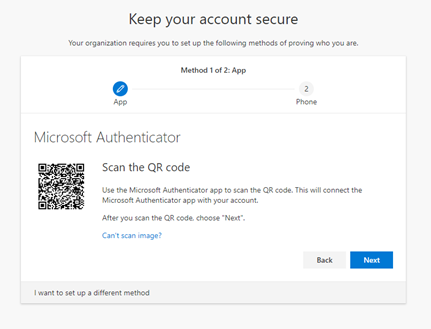
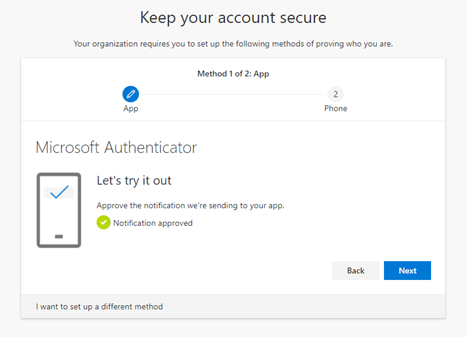
Now that the app has been registered against your account, let’s validate that it has been set up correctly
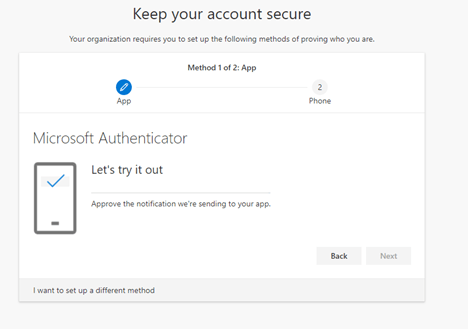
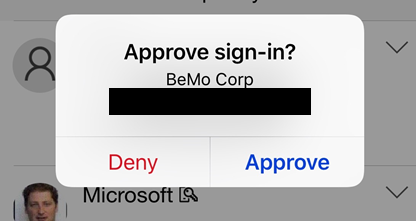
You will receive a ‘pop up’ notification from Microsoft Authenticator. You will need to press the Approve button to move forward. The nice thing is that, compared to SMS, MFA does not require you to type any number, making the process faster and easier.
If the setup is successful, you will receive the following confirmation: “Notification approved”
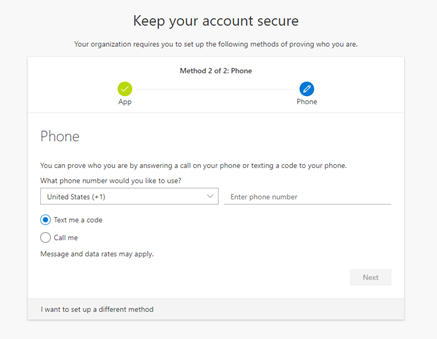
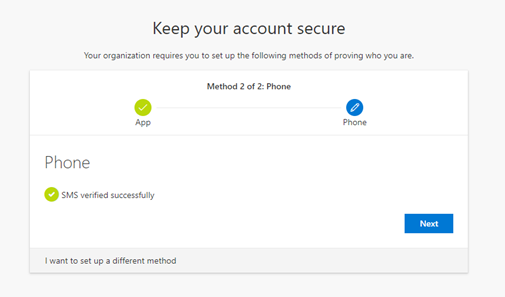
Now, you will set up a backup option: the normal MFA via SMS. You will be asked to enter your mobile phone number and decide if you want to have your validation done via an SMS or by having Microsoft call you.
In the example below, I have chosen the SMS option. Once you receive the SMS, enter the 6 digit code and click Next
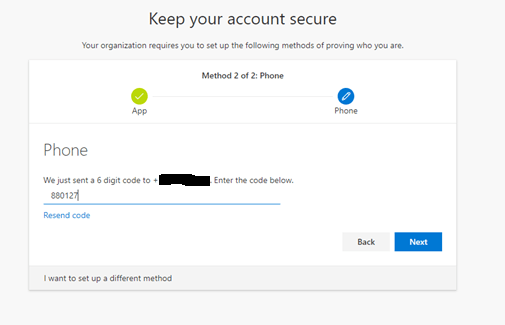
When successful, you will receive the following screen “SMS verified successfully”
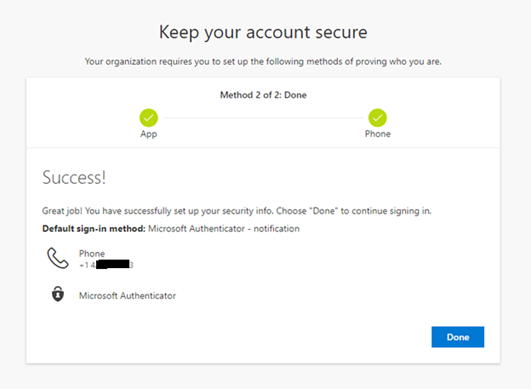
You are now ready to use Microsoft Authenticator as the default sign-in method
Congratulations! You have taken the final step in our four steps to email security series! Missed a step? Here's what you need:
For complete email security you should:
- Configure SPF, DMARC, and DKIM
- Deploy Exchange Online Protection
- Set up Office Message Encryption (full post coming June 2020)
- Enable Office 365 Advanced Threat Protection
- Enable Office 365 MFA (this blog post)
Questions? Comments? Leave your thoughts below or feel free to:

Curious how your security stacks up? Take our free, five-minute cybersecurity risk calculator quiz here:

Sign up & receive BEMO content right to your inbox.

Leave us a comment!