-2.png?width=1080&height=1080&name=Untitled%20design%20(5)-2.png "bemo logo")

In this blog post, we'll be giving you the step-by-step instructions for configuring Office Message Encryption. I have to say they aren't for the faint at heart! Enabling OME is much more difficult than the other Microsoft email security products such as Office 365 ATP, Exchange Online Protection, or configuring DKIM, DMARC, and SPF.
This blog is the 3rd post of a 5 post series titled Your Complete Guide to Microsoft Email Security. The 5 steps to email security are:
- Configure DKIM, DMARC, SPF
- Deploy EOP (Exchange Online Protection)
- Enable Office Message Encryption (this blog post)
- Enable Office 365 ATP (Advanced Threat Protection)
- Enable Office 365 MFA with Authenticator App
Note: This blog was last reviewed 2/2022. We do our best to keep all of our blogs up to date to offer you the best, most accurate guidance possible. If you notice otherwise, please drop a comment so we can update the blog. Thank you!
Do I Need Security?
Short answer: yep.

If you're still not convinced why you need email security Microsoft breaks it down here nicely:
"People often use email to exchange sensitive information, such as financial data, legal contracts, confidential product information, sales reports and projections, patient health information, or customer and employee information. As a result, mailboxes can become repositories for large amounts of potentially sensitive information and information leakage can become a serious threat to your organization."
What is Office Message Encryption (OME)?
Office Message Encryption (OME) allows your organization to send and receive encrypted messages, even to people outside of your organization. Encryption makes it so that only your intended audience can view the sensitive information your messages contain.
Setting Up Office 365 Message Encryption
Alright, now that we've got the basics under our belts, let's get started!
- Go to https://portal.office.com
- Sign in with Global Admin credentials
- Click on Admin
- Click on Settings
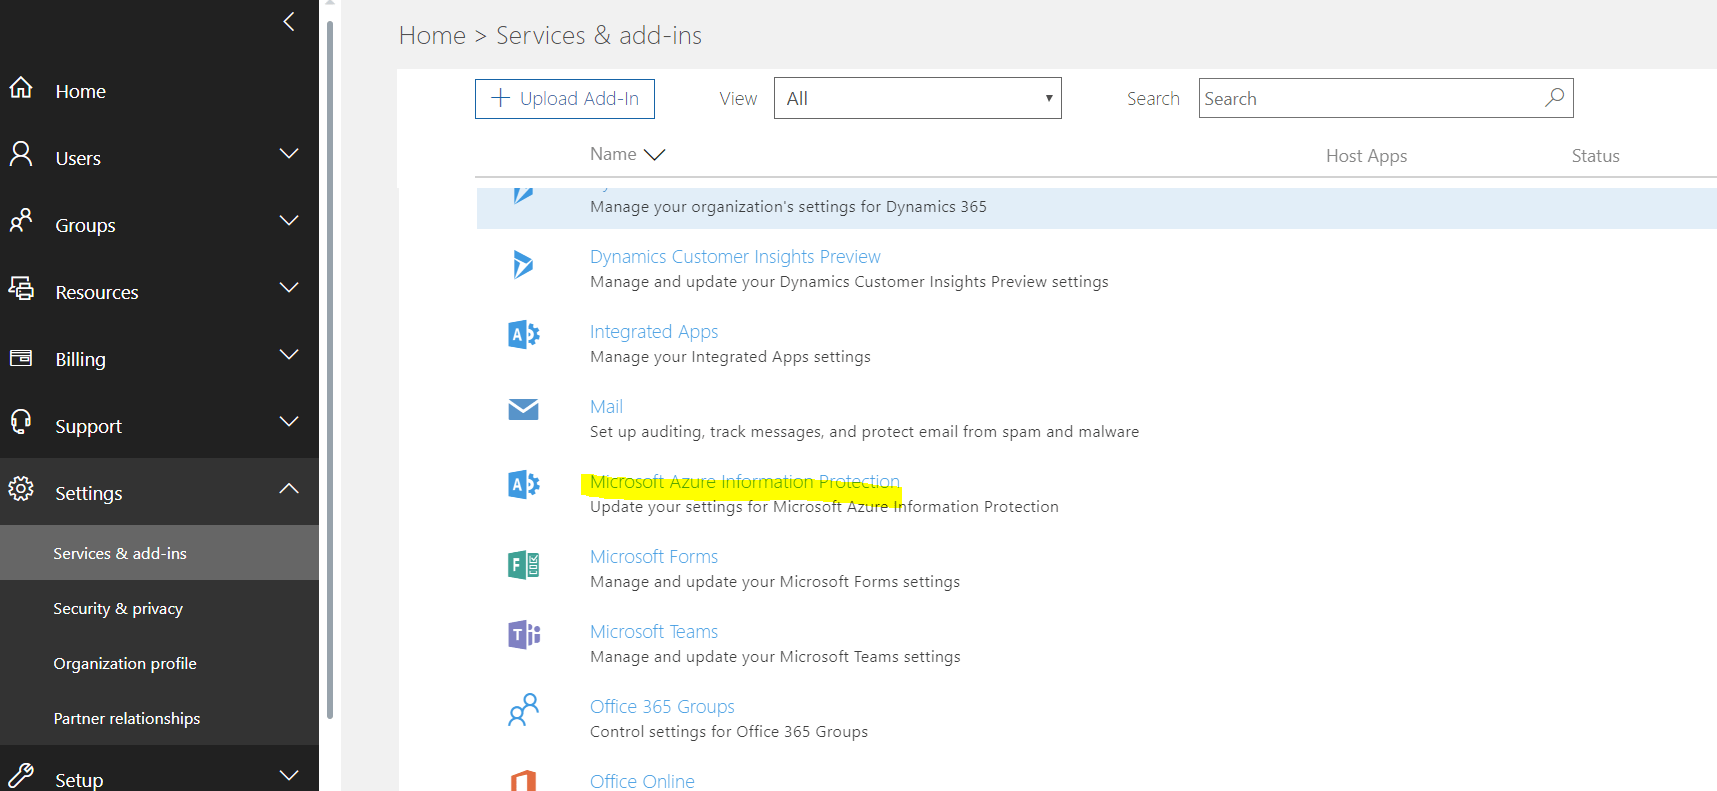
- Click on Services & add-ins
- Click on Microsoft Azure Information Protection
You will be sent to:

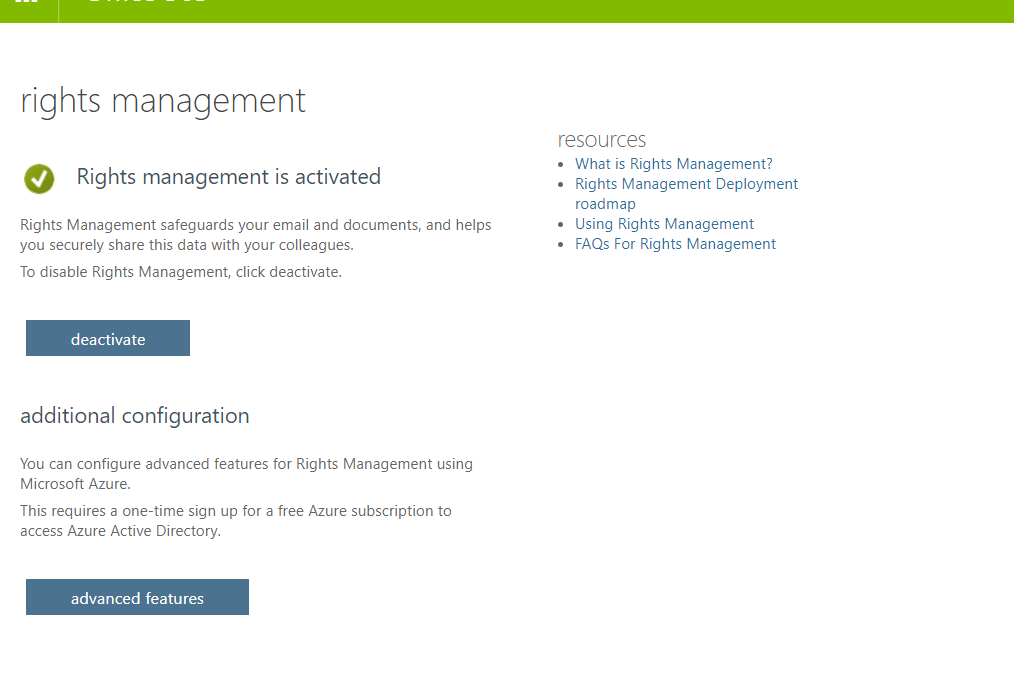
- Click on Manage Microsoft Azure Information Protection setting
- Make sure that Rights Management is activated (if not, please activate it)
 If your organization uses multi-factor authentication (MFA) to connect to Exchange Online PowerShell, follow the instructions: MFA requires you to install the Exchange Online Remote PowerShell Module, and use the Connect-EXOPSSession cmdlet to connect.
- Get to the Exchange admin center
- You must have Office 365 admin permissions to access the Exchange admin center.
- You need to use Edge - Chrome does not work
- Sign in to Office 365 using your work or school account, and then choose the Admin tile.
- In the Office 365 admin center, choose Admin centers > Exchange.
- Click Hybrid
- Click the Configure button under The Exchange Online PowerShell Module supports multi-factor authentication. Download the module to manage Exchange Online more securely.
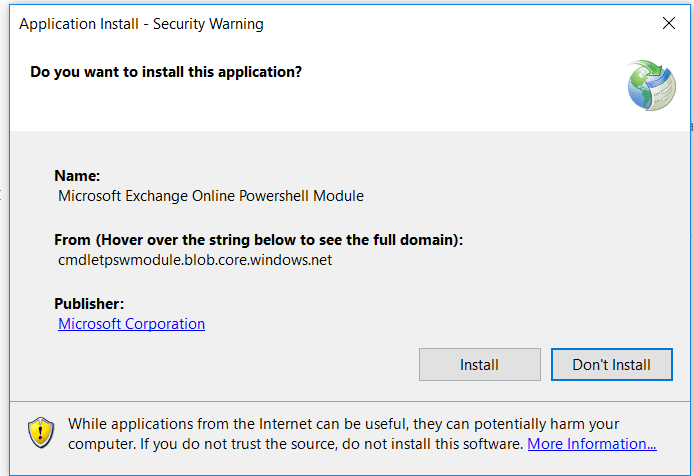
You will get the following prompt:

- Click Open
- The following screen will appear
-
Click Install
-
Once done, a similar screen will open
- You can now close the screen above
- Windows Remote Management (WinRM) on your computer needs to allow basic authentication (it's enabled by default). To verify that basic authentication is enabled, do the following:
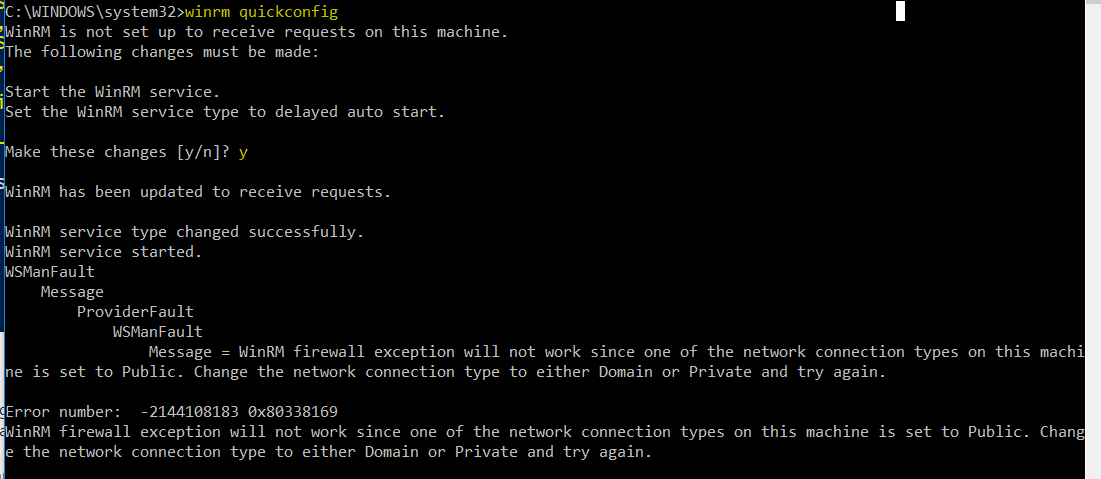
- Open a Command Prompt Session (as an Admin)
- Run this command in a Command Prompt:
- Winrm quickconfig
- Answer Y to Make these changes [y/n]
- You will likely get the error below - just ignore
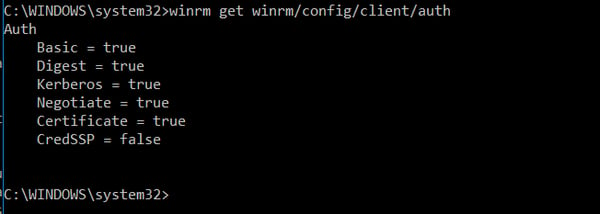
- Type: winrm get winrm/config/client/auth
- If you don’t see the value Basic = true, you need to run this command to enable basic authentication for WinRM:
winrm set winrm/config/client/auth @{Basic="true"}
- If you don’t see the value Basic = true, you need to run this command to enable basic authentication for WinRM:
- If basic authentication is disabled, you'll get this error when you try to connect:
- he WinRM client cannot process the request. Basic authentication is currently disabled in the client configuration. Change the client configuration and try the request again.
Once done, you should see the screen below
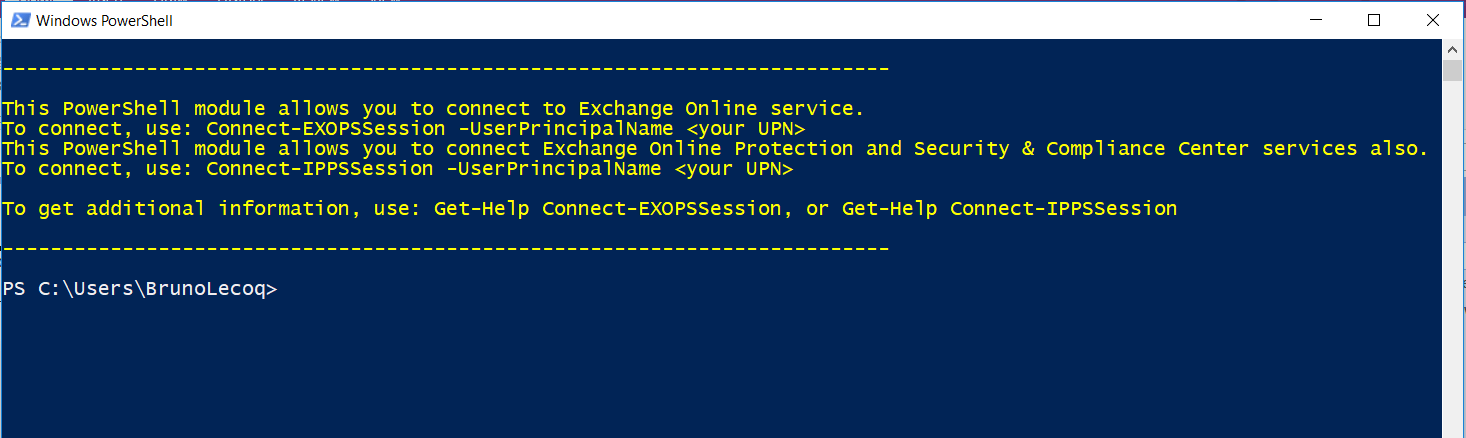
Connect to Exchange Online PowerShell by using MFA
- On your local computer, open the Exchange Online Remote PowerShell Module (Microsoft Corporation > Microsoft Exchange Online Remote PowerShell Module).
- The command that you need to run uses the following syntax:
- Connect-IPPSSession -UserPrincipalName <username>@bemopro.com
Once logged in, you will get a screen similar to:

- You will now need to import the newly installed modules.
- Import-Module AADRM
- Import-Module AADRM
- To see which cmdlet is available for the newly imported module type the following.
- Get-Command -Module ADDRM
- Get-Command -Module ADDRM
- To get started we need to connect to Azure RMS, type the following cmdlet and enter the credentials of a Global Administrator.
- Connect-AadrmService
- Now that we have a successful connection establish with Azure RMS, we can go ahead and run the following Cmdlet to Enable Azure RMS.
- Enable-Aadrm
- Get the configuration information needed for message encryption.
- $rmsConfig = Get-AadrmConfiguration
$licenseUri = $rmsConfig.LicensingIntranetDistributionPointUrl
- $rmsConfig = Get-AadrmConfiguration
- Disconnect from the service.
- Disconnect-AadrmService
- Create a remote PowerShell session and connect to Exchange Online.
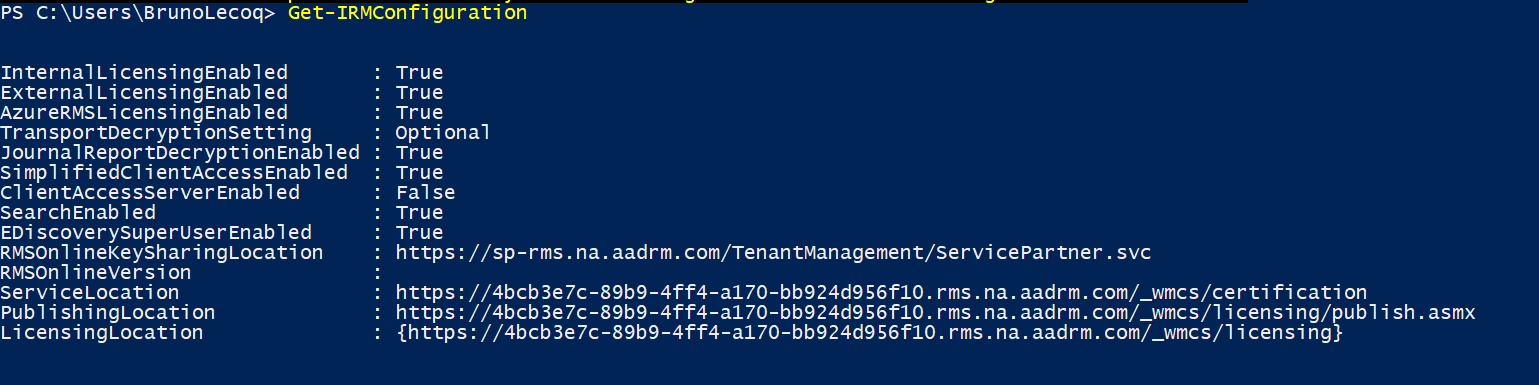
Connect-EXOPSSession -UserPrincipalName <username>@bemopro.com - Collect IRM configuration for Office 365
- $irmConfig = Get-IRMConfiguration
$list = $irmConfig.LicensingLocation
if (!$list) { $list = @() }
if (!$list.Contains($licenseUri)) { $list += $licenseUri }
- $irmConfig = Get-IRMConfiguration
- Enable message encryption for Office 365
- Set-IRMConfiguration -LicensingLocation $list
Set-IRMConfiguration -AzureRMSLicensingEnabled $true -InternalLicensingEnabled $true
- Set-IRMConfiguration -LicensingLocation $list
- Enable server decryption for Outlook on the web, Outlook for iOS, and Outlook for Android.
- Set-IRMConfiguration -ClientAccessServerEnabled $true
- Set-IRMConfiguration -ClientAccessServerEnabled $true
- Once done, run the following test
- Test-IRMConfiguration –sender <username>@bemopro.com

-
- Set-IRMConfiguration -ClientAccessServerEnabled $false
Office Message Encryption - Things to Consider
1) You need to enable Google, Yahoo, and Microsoft Account recipients to use these accounts to sign in to the Office 365 Message Encryption portal
By default, when you set up the new Office 365 Message Encryption capabilities, users in your organization can send messages to recipients that are outside of your Office 365 organization. If the recipient uses a social ID such as a Google account, Yahoo account, or Microsoft account, the recipient can sign in to the OME portal using the social ID.
2) To manage whether or not to allow recipients to use social IDs to sign in to the OME portal
- Run the Set-OMEConfiguration cmdlet with the SocialIdSignIn parameter as follows:
- Set-OMEConfiguration -Identity "OME Configuration" -SocialIdSignIn $false
- To enable social IDs:
- Set-OMEConfiguration -Identity "OME Configuration" -SocialIdSignIn $true
3) Managing the use of one-time passcodes for signing in to the Office 365 Message Encryption portal
By default, if the recipient of a message encrypted by OME doesn't use Outlook, regardless of the account used by the recipient, the recipient receives a limited-time web-view link that lets them read the message. This includes a one-time passcode. As an administrator, you can manage whether or not one-time passcodes can be used to sign-in to the OME portal.
To manage whether or not one-time passcodes are generated for Office Message Encryption
- Run the Set-OMEConfiguration cmdlet with the OTPEnabled parameter as follows:
- For example, to disable one-time passcodes:
- Set-OMEConfiguration -Identity "OME Configuration" -OTPEnabled $false
- To enable one-time passcodes:
- Set-OMEConfiguration -Identity "OME Configuration" -OTPEnabled $true
- For example, to disable one-time passcodes:
4) Managing the display of the Protect button in Outlook on the web
By default, the Encrypt button in Outlook on the web is not enabled when you set up OME. As an administrator, you can manage whether or not to display this button to end-users. To manage whether or not the Protect button appears in Outlook on the web:
- Run the Set-IRMConfiguration cmdlet with the -SimplifiedClientAccessEnabled parameter as follows:
- For example, to disable the Encrypt button:
- Set-IRMConfiguration -SimplifiedClientAccessEnabled $false
- To enable the Encrypt button:
- Set-IRMConfiguration -SimplifiedClientAccessEnabled $true
5) Enable service-side decryption of email messages for iOS mail app users
The iOS mail app can't decrypt messages protected with Office 365 Message Encryption. As an Office 365 administrator, you can apply service-side decryption for messages delivered to unenlightened clients like the iOS mail app. When you choose to do this, the service will send a decrypted copy of the message to the iOS device. The message is stored decrypted on the client device. The message also retains information about usage rights even though the iOS mail app doesn't apply client-side usage rights to the user. This means that the user can copy or print the message even if they did not originally have the rights to do so.
However, if the user attempts to complete an action that requires the Office 365 mail server, such as forwarding the message, the server will not permit the action if the user did not originally have the usage right to do so. Still, end-users can work around Do Not Forward usage restriction by forwarding the message from a different account in their iOS mail app.
Regardless of whether you set up service-side decryption of mail, any attachments to encrypted and rights protected mail cannot be viewed in the iOS mail app. If you choose not to allow decrypted messages to be sent to iOS mail app users, users receive a message that states that they don't have the rights to view the message. By default, service-side decryption of email messages is not enabled.
Office Message Encryption: The Wrap-Up
As you can see, setting up OME is no small undertaking but hopefully, these steps got you through to the other side. If you have any questions or thoughts, please feel free to comment below.
We implement OME with all of our cybersecurity plans. Check them out 👉 here
Questions? Schedule a meeting by clicking the button below:

Curious how your current security stacks up? Take our 5-minute cybersecurity risk calculator quiz to find out:

Sign up & receive BEMO content right to your inbox.

Leave us a comment!