-2.png?width=1080&height=1080&name=Untitled%20design%20(5)-2.png "bemo logo")


In my previous two blogs, Business Voice Part I & II, I explained what Business Voice is and shared with you what you typically need to deploy a phone system (along with its numerous benefits: enabling organizations of all sizes to take advantage of a 100% cloud-based telephony solution, its flexibility, affordability and compliance). In this part 3, we will provide you with the step-by-step instructions you need to program your phone system with Microsoft voice.
Did you miss the first two blogs of this series? Check them out here:
Business Voice, Part I: What is it and Do I Really Need It?
Business Voice, Part II: Office 365 Phone Setup Prep
Teams Updates
Before we start, I’d like also to preface this blog by saying that Microsoft Teams is in constant evolution. New features are being added and its User Interface is also going through some changes as well. The same goes for these directions. If you have an issue, feel free to reach out. At BEMO, we have an internal checklist for deploying a phone system that covers over 100 items. In this blog, I won't get too mired in minor details so we can instead focus on what is not already well documented in the Microsoft docs and the steps that are often overlooked.
Still unsure if Teams + Business Voice is right for you? Watch as our customers talk through their decision to go with Business Voice by clicking on David's picture below:

Pre-Requisites
First, we will assume you have all the pre-requisites we discussed in prior blogs. Secondly, there are a few more things you want to pay attention to, here they are:
Vanity Domain
Make sure you have a vanity domain (like [mycompanyname].com ) associated and verified with your tenant. If you just have the native .onmicrosoft.com, you won’t be able to go very far.
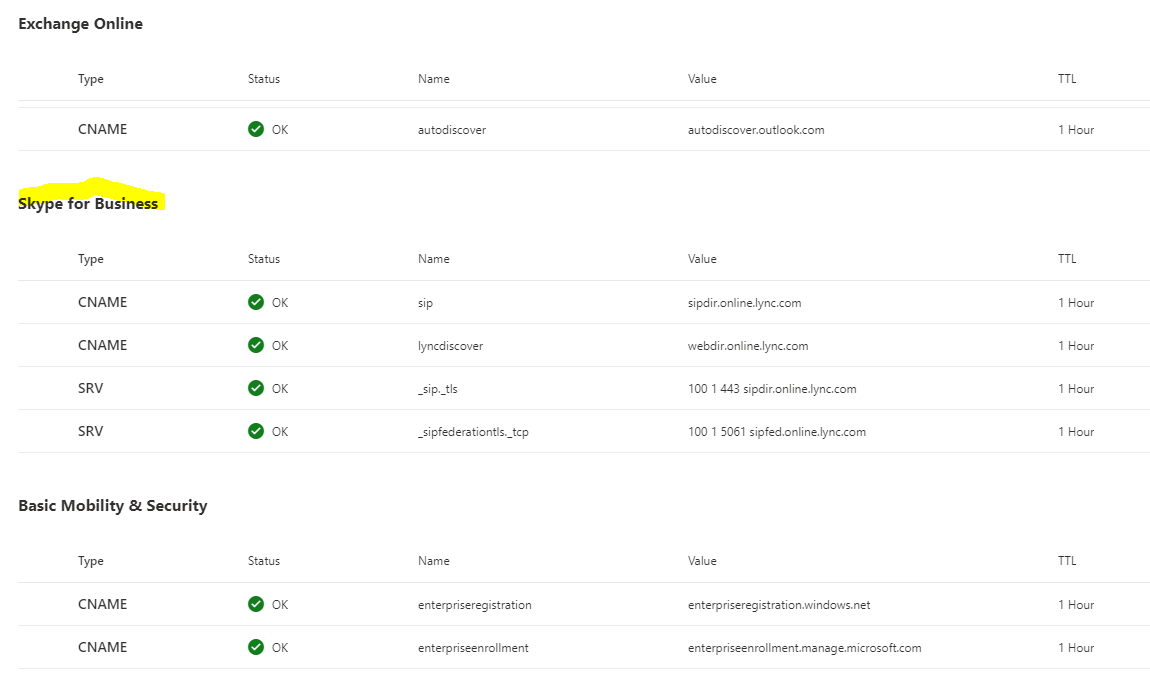
DNS Records
There are a few Teams specific DNS records you need to have to ensure Teams is working properly. Take a few minutes to make sure you have all of them set up properly. Go to your Office 365 Admin Center Domain page and run the DNS check. They might be still called “Skype for Business” in the UI with reference to “lync”. This is normal and your DNS records should look similar to this.
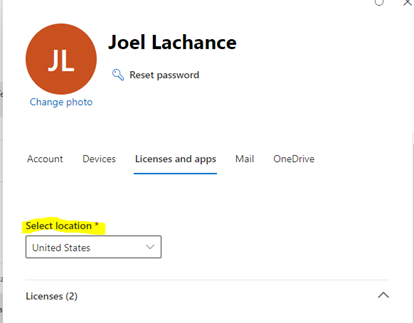
User Location
Make sure you have set a location for each user part of your organization. Without a location set, you will not be able to assign a phone number to those users. You will see that property in the license tab for the user in question. You can find this setting by going to Office 365 admin center > Users > Active users. Here is an example:
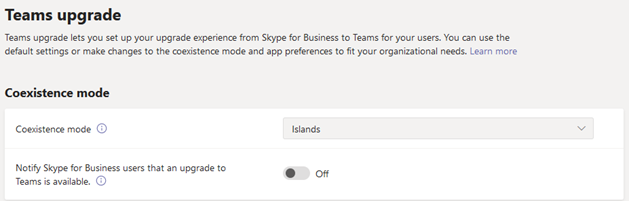
Teams Coexistence Mode
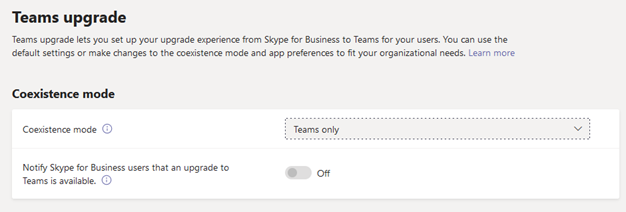
If your tenant was created a while ago, go check your Teams > Org-wide-settings > Teams upgrade. If it is not set to Teams Only, then make the flip ASAP. If you do not, some calling features available in Teams might be disabled or calls might be routed to Skype for Business, not Teams.
WRONG!
RIGHT!
The video below walks you through all of these steps:
Communication Credits
Communication Credits are not mandatory, but I do recommend you get them upfront to prevent running out of minutes when a very important person in your org has dialed out during a conference call or if you are setting up a toll-free number. This BEMO KB (Knowledge Base) article will walk you through the purchasing steps. Note that communication credits can only be purchased on www.office.com, they are not available via the CSP program.
Phone Number Porting
Lack of planning and attention to detail will set you back weeks if not months when you try to port your phone numbers. Here is what I recommend you also do:
- Contact your losing carrier and ask for a copy of your Customer Service Records or CSR. You would be surprised how often it will look different from your actual phone bill, especially if you purchased services and numbers at different times or if your carrier has been acquired by another company. It can be even trickier if your current service provider is just a reseller and not a carrier, per se. Those CSR will help reduce the chances that your porting order will be rejected
- Check your phone service contract. If your phone service is bundled with other services, like the internet or others, then you will have to work with your service provider to decouple the phone service from the other stuff and possibly re-negotiate new terms. At the time of porting, if you have your phone service bundled with other things, very likely this will cause an automatic rejection of your porting order.
Plan Ahead and Cut Yourself Some Slack
It may take a while to activate some telephony features. Give it at least 15 minutes before trying to assign a phone number to any given resources which just got licensed for a virtual user or a calling plan especially if you are doing this via the UI. There was a time when I experienced it taking more than 24 hours to complete this simple task. If you are in a hurry and run into this, then consider using PowerShell commands.
Slow n' steady...
Now, let’s get started...
Business Voice & Teams Step-by-Step Setup
Acquire Phone Numbers
Phone numbers for users and service type lines are in high demand and in short supplies for certain area codes. I recommend you do not delay and acquire as many phone numbers as you need plus a reasonable amount to spare. That being said, please do not practice hoarding, and if you find yourself with numbers in excess, release them back so that someone else can grab them.
If you are just in need of temporary numbers while your porting is pending, then the area code is not so critical and if you end up keeping and using these so-called temp numbers, there are ways to set the caller ID to be your company main number. Therefore, whoever receives the call will not see your actual phone number and extension.
While the user interface may suggest there are no numbers available for certain area codes, your Microsoft Partner has the means to request them with the proper justification. Again reach out to your Microsoft Partner or drop me a line.
Curious if we're the Partner for you? Don't take our word for it! Listen to our customers talk about their experience with BEMO:

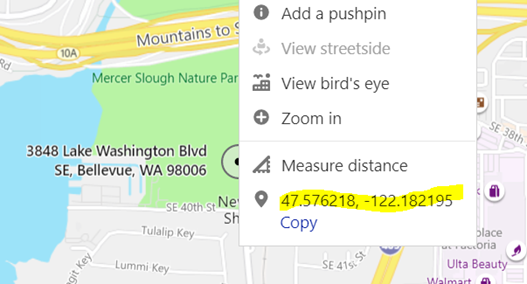
Set E911 Records
When you create your E911 record locations, you can either specify a building address or coordinates (latitude and longitude). If you do not have GPS handy, simply pull your favorite online maps app, and right-click on the location you wish to record. It will bring up the coordinates, just as illustrated in this example here:
Create Resource Accounts for Your Auto Attendant(s) and Call Queue(s)
How many auto attendant(s) and call queue(s) you need, will depend how your organization is structured and the options you want to program for your call routing. Here are some general rules
- 1 auto-attendant per company location and time-zone
- 1 auto-attendant if you have functional groups that operate at different hours and require a different call routing
- 1 additional auto attendant if you want to program dial by name AND dial by extension
- 1 additional auto attendant every time you plan for more than 9 menu options
- 1 additional auto attendant if you have more than 1 main phone number where a customer can call in to a different area code or country code, for example
- 1 additional auto-attendant of every toll-free number
I recommend using a call queue whenever you have a function or department that includes more than 1 user. For example, if you have a Sales, Support, and Accounting department, each with 2 or more members, then you should create 3 resource accounts paired with 3 call queues.
To create a resource account:
- Go to Teams admin center > Org-wide settings > Resources accounts
- Click Add
- Fill in the properties depending on how you plan to use the resource. There is no set convention username-wise, but I like to set them to phone-cq-xxxx for call queues or phone-aa-yyyy for auto attendant. Now is also a good time to set a display name that will help you sort those out.
HINT: At all costs, avoid renaming resources, auto attendants or call queues. As silly as it may sounds, this may temporarily prevent you from making additional changes to your settings or worse, disable call routing until the name changes have gone through the system.
Assign a license to these newly created resources
For practical purposes, a Microsoft 365 Phone System – Virtual User license will do and those are free! Go find these resources in your Office 365 Admin Center > Users > Active and assign the license. Yes, these resources have their sign-in property blocked, this is by design (leave it that way).
Assign a phone number
Wait 15 minutes after you've assigned the licenses before trying to assign a number. Now, do I need to assign a phone number to each auto-attendant and call queue? It depends. If you need an auto-attendant or call queue to be reached directly from outside callers, then yes you will have to assign a phone number. If access to the call queue is only controlled by menu options in your auto-attendant, then you do not need to assign a phone number to that call queue.
The video below shows how to create Resource Accounts for Auto Attendant and Call Queues:
Create Call Queues Before Auto-Attendants
Using the same example as earlier, you could create 3 call queues. One for Sales, one for Support and one for Accounting
If you have an order in which you want the calls to be routed then add the user one-by-one and sort them in the proper sequence. You can also add an Office 365 group to the list but keep in mind there is no particular order you can specify for the members of that group.
Use this link: https://admin.teams.microsoft.com/policies/callinglineid
Assign the proper resource account you had created in a prior step
The video below shows how to create an auto attendant and a call queue:
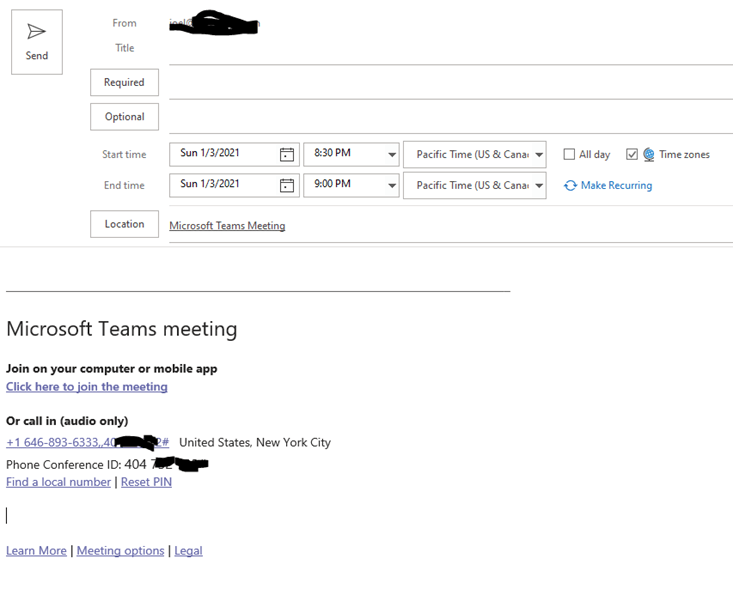
Meeting with Microsoft 365 Audio Conferencing
Microsoft 365 Audio Conferencing, which comes in a standalone SKU or bundled with Microsoft 365 Business Voice, is practically ready to go as soon as you have assigned the license to your users. Out of the box, you will get a default conference number assigned to your tenant along with a list of additional local numbers to dial in from different parts of US and around the world. A full list of available conference dial-in numbers can be found here.
Your Outlook client will also feature the “New Teams Meetings” option which enables you to schedule a meeting with one click, as illustrated here:

Testing and User Adoption
First, I recommend you share this knowledge-based article with all your users. In this article, they will learn how to setup their voicemail, place a call and setup call forwarding from Teams.
Second, you want to put your call routing to the test by placing a call to your auto attendant main number and testing the different menu options you have programmed, including voice prompts, dial by name, options and routing to call queues.
Once you are comfortable with the results of your programming, you should put your system to use. Depending on the size of your organization and number of office locations and departments, you might have to foster user adoption by groups or phases, first choosing target users as early adopters. In its simplest form, you will eventually perform at least one of these steps:
- If you do not have any phone number porting pending, you can publicize your main number(s) and user numbers
- If phone number porting is pending for your users, you could set an unconditional call forward from their permanent number to the respective temporary number. That way calls from your legacy phone services will come right into Teams and users won’t have to be tethered to their old phone system.
- If phone number porting is pending for your service number(s), aka main line(s), you could set an unconditional call forward from your permanent number (s) to the respective temporary number. That way calls from your legacy phone services will come right into Teams and users won’t have to be tethered to their old phone system.
Hints:
For option 2, we do recommend you set your caller ID policy to the main company number and not the user since their respective temporary number will eventually go away.
For option 3, I do recommend the following to minimize the chance of missing a call:
- Set up your temporary auto attendant as instructed earlier and assign a number to it
- Setup an additional auto attendant as a staging auto attendant
- Program that staging auto attendant to forward all calls to your temporary auto attendant
- Program your legacy phone system which still holds the permanent number to forward calls to that staging auto attendant
Doing so, will allow all calls made to your permanent to go straight to your main auto attendant in Teams while your porting order is being reviewed. Then on the day your porting is executed you can simply assign the permanent number to your staging auto attendant, and if external callers are still placing calls to your temporary main number (which they may know from your caller ID), the call will still come through.
What Else?
There are other cool features you want to become familiar with and implement as needed. Here is a short list:
Call sharing and group call pickup
The Wrap-Up
Phone communication is an essential business tool and our golden standby. Making sure you have effortless calling, conferencing and connection is a tool you'll never regret. Hopefully, having walked through these last three blogs has been a helpful step in the right direction! As always, should you have an issue or a question, please feel free to reach out to us! Good luck!

Sign up & receive BEMO content right to your inbox.

Leave us a comment!