-2.png?width=1080&height=1080&name=Untitled%20design%20(5)-2.png "bemo logo")


If there is one thing that gets an IT professional’s heart pumping, it’s being asked to be part of a migration.
From the planning and testing to the cutover and maintenance, there are so many things that could go wrong. Now add into the mix the idea that the system to be migrated is your enterprise email—aka the No. 1 communication mechanism of your organization—and we’ve got a real nail-biter on our hands.
Fortunately, with BEMO, you never have to go it alone.
Whether you’ve been tapped to lead the migration from Google Workspace to Office 365 or you’re just wondering what steps are involved, the BEMO team has compiled a step-by-step process (pulled from our implementation team’s secret vault!) that you can follow to knock this migration out of the park.

Let’s get started! Get your game face on and keep scrolling!
Note: These instructions were last updated in December 2022. We are continually reviewing our how-to steps to provide you with the most accurate guidance possible, but if you notice otherwise, please don't hesitate to drop a comment below.
Before You Start: Key Things to Remember
If your team is used to everything Google Workspace and is worried about a migration to Microsoft Office 365, there’s no need to worry; Office 365 has similar tools and features as Google but with the added benefit of easy integration with Microsoft’s full suite of ubiquitous business applications.
However, there are a few limitations to what can be migrated from Google Workspace to Microsoft Office 365. An overview of what can and what cannot is summarized below:
What can be migrated from a user’s Google Workspace?
- Inbox
- Folders
- Message labels
- Muted emails
- Contacts
- Calendars (including links for Google Hangouts within calendar meetings)
- Calendar notifications
- Google message categories flags (i.e., Social, Promotions, Updates, Forums)
Note: Links for Google Hangouts are a new default feature added to Google Meet, so Microsoft Office 365 doesn't have the corresponding property to map. Therefore, when migrating to Office 365, the links for Google Hangouts are added to the beginning of the meeting description body text in Office 365.
What cannot be migrated from Google Workspace to Office 365?
- Calendar reminders
- Appointments
- Chat message attachments
- Calendar attachments
- Tasks
- Chats and chat history
- Google Groups for Business (including forums and collaborative inboxes)
- Google categories (i.e., the Google category flags: Social, Promotions, Updates, Forums)
- Email attachments that are links to Google Drive
- Some calendar colors
Note: All color category meta tags are transferred over, but Office 365 does not have direct color mappings from Google Workspace. Therefore, some colors do not get mapped over to Office 365 and will not be displayed in Office 365 for those select calendar entries.
Set the stage to migrate from Google Workspace to Office 365 successfully.
To help with developing your migration schedule, note that Google sets a threshold that only 2GB may be transferred per user per day.
Additionally, the organization should have the following information, requirements, and access ready to facilitate a smoother migration process:
- You confirm that the parent domain name equals the SOA record.
- Navigate to https://intodns.com/.
- Enter the domain.
- Check that the parent domain NS matches the SOA record.
- You have DNS access.
- You have the first name, last name, username, password, and phone number of the Google Workspace administrative owner.
- You have the first names, last names, usernames, and phone numbers of all the users.
- You know the other administrative users within Google Workspace.
- Google MFA has been turned off for the admin user.
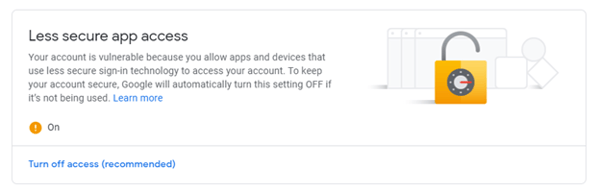
- “Less secure app access” is turned on.
Okay, are you ready? Let's dive in! This process should take about 90 minutes.
The End-to-End Process to Migrate from Google Workspace to Office 365
The BEMO team has broken down the process to migrate from Google Workspace to Office 365 into 16 steps, but that’s not because the process is overly complicated. Instead, BEMO wanted to break down the process into easily digestible chunks so your team can not only understand each step but also get that awesome feeling of accomplishment as you check off each as you go.
Note: This step-by-step walk-through is designed to use the Google API (versus the IMAP protocol). BEMO recommends this option because using the Google API will allow the migration tool to migrate more objects.

Step 1: Complete preparation and initial synchronization.
Turn off baseline security on your Office 365 tenant.
- Go to https://portal.azure.com.
- Open Azure Active Directory.
- Select “properties.”
- Click “manage security defaults.”
- Set “enable security” defaults to no.
- Click “other.” and provide a reason, such as “migration from Google Workspace”
- Click “save.”
Step 2: Connect to the Gmail administrator account.
- You will need the Administrator’s MFA code in order to connect to their account.
- Connect to the Gmail administrator account via https://www.google.com/gmail/ or https://admin.google.com/.
- Once you have connected to the admin’s Gmail account, please make sure to validate that the Google MFA is turned off and "allow access to less secure apps" is turned on as described below.
Step 3: Validate that Google MFA is turned off and “allow access to less secure apps” is turned on.
- Click “account” (top right corner) and click “Google account.”
- Click “security.”
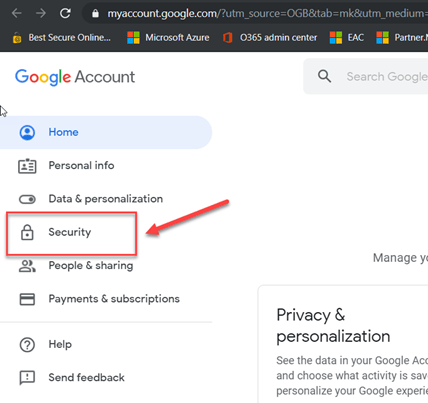
- Make sure that “use your phone to sign in” and “2-step verification” are both turned off.
- Make sure that “less secure app access” is turned on.
Step 4: Prepare your target O365 tenant.
- Verify the Vanity domain
- Log in on M365 Admin Center https://admin.microsoft.com.
- Click Settings > Domains > Add domain
- Add the name of the domain that is migrated (vanity domain)
- The interface will ask you to add a TXT record on the DNS to verify that you own the domain. Add the requested DNS record, wait until the record has propagated over the internet and proceed with the verification step.
- DO NOT COMPLETE THE DOMAIN SETUP PROCESS AT THIS STAGE (that would be bad!). The interface will tell you the setup is incomplete but you will be able to create accounts using this domain, that’s the goal.
- Add users in Office 365 and assign them an Exchange Online licenses from either a standalone plan or through a subscription that contains at least an Exchange Online plan. As mentioned in the previous step, email addresses for accounts created should be the same as the ones on Google side.
Step 5: Grant Google API permission.
- Open your web browser in incognito or private browsing mode.
- Open https://console.cloud.google.com.
- Log in using your Google Workspace admin credentials.
- Click “select a project.”

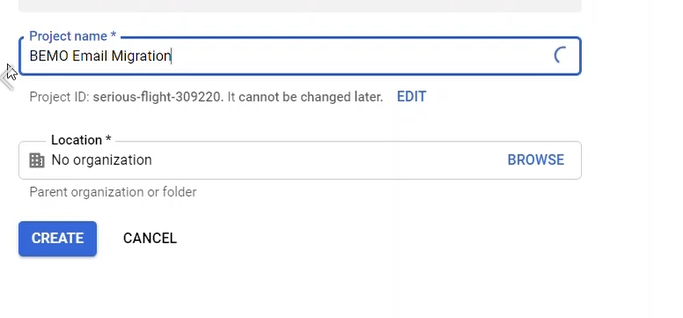
- Click “new project.”
- Name your project and keep the location as default. Click “create.”
- Click “enable APIs and services” in the top ribbon.

- Search for Google Calendar.

- Click “enable.”

- Click “enable APIs and services” in the top left corner.
- Repeat the same steps and make sure to enable the following APIs:
- Gmail API
- Google Calendar API
- Tasks API
- Google Contacts CardDAV
- CalDAV API
- Google Drive API
- Admin SDK API
- Google People API

Step 6: Create a Google service account.
- Click the hamburger menu.
- Select “IAM & admin.”
- Click “service accounts.”

- Click on “create service account.”
- Give a name to the account (i.e., bemomigration).
- Click “create.”
- Click “done.”
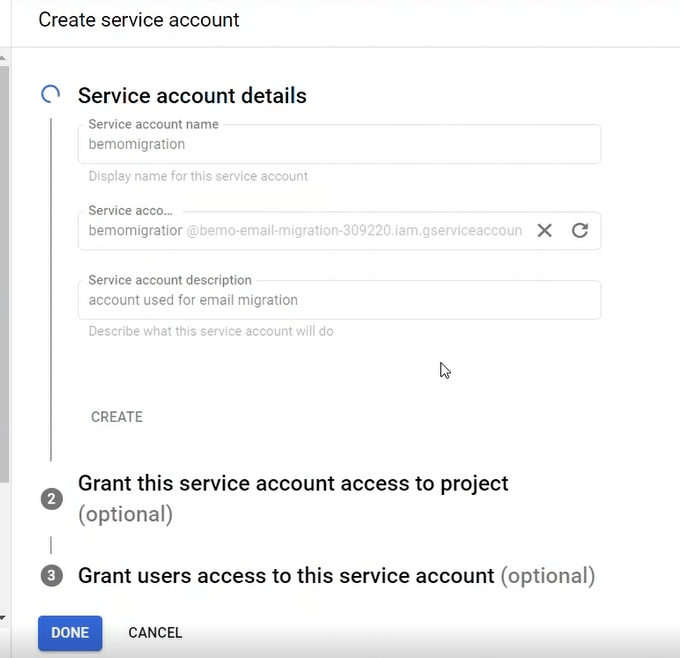
- Grant the owner role.
- Click “continue.”

- Under “grant users access to this service account,” click “done.”
Step 7: Create a key.
- Select the account by selecting the check box.
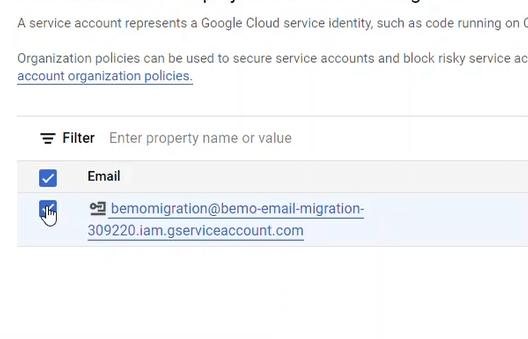
- Under “actions,” click on the three dots.
- Select “manage keys.”

- Under the “keys” tab, select “add key.”
- Click “create new key.”

- Select “JSON” and click “create.”

Important! Make sure to copy the private key and save it in a secure location. It will be used later in this process.
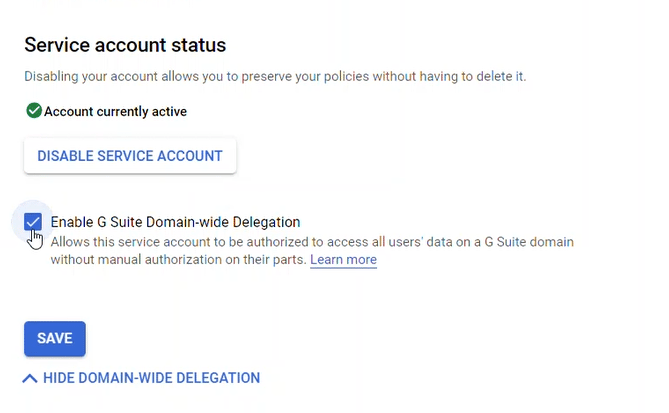
Step 8: Make a copy of the unique ID.
- Click on the email account.

- Copy the unique ID into your notepad.

- Click “show domain-wide delegation.”
- Select “enable G Suite domain-wide delegation.”
- Click “save.”
Step 9: Enable Google accounts delegation.
- Go to https://admin.google.com.
- Log in.
- Click “security.”

- Scroll down and click “API control.”
- Click “manage domain-wide delegation.”
- Click “add new.”
- Paste the unique ID you saved in your notepad earlier.
- Copy the following links within the “OAuth scopes” textbox: https://mail.google.com/, https://www.google.com/m8/feeds, https://www.googleapis.com/auth/contacts.readonly, https://www.googleapis.com/auth/calendar.readonly, https://www.googleapis.com/auth/admin.directory.group.readonly, https://www.googleapis.com/auth/admin.directory.user.readonly, https://www.googleapis.com/auth/drive, https://sites.google.com/feeds/, https://www.googleapis.com/auth/gmail.settings.sharing, https://www.googleapis.com/auth/gmail.settings.basic, https://www.googleapis.com/auth/contacts.other.readonly, https://www.googleapis.com/auth/contacts, https://www.googleapis.com/auth/calendar, https://www.googleapis.com/auth/tasks, https://docs.google.com/feeds/, https://docs.googleusercontent.com/, https://spreadsheets.google.com/feeds/, https://www.googleapis.com/auth/admin.directory.user, https://www.googleapis.com/auth/admin.directory.group, https://www.googleapis.com/auth/admin.directory.orgunit, https://www.googleapis.com/auth/carddav, https://www.googleapis.com/auth/gmail.labels
- Click “authorize.”

Step 10: Start the BitTitan migration.
Because of the importance of this data migration, BEMO recommends using an industry-leading migration tool, BitTitan. BitTitan is one of the best migration tools available. It’s known for its flexibility, easy-to-use interface, and reliable, secure transfer capabilities.
- Open the BitTitan portal at https://www.bittitan.com.
- Click “create a project.”
- Click “mailbox project.”
- Enter the project and customer names and click “next steps.”
- Create your endpoint name, and select “G Suite (Gmail API)” as the endpoint type.

- Under “provide the Google service account credentials using JSON file,” click “select” and choose the JSON file that you downloaded earlier when creating your service account.
- Under “super admin,” enter the account username and click “add.”

- Click “next step.”
- To set a destination endpoint name, select “Office 365” as the endpoint type.
- Enter the administrator username and password.
- Click “add.”
- Click “save and go to summary.”
- Click “save project.”
Step 11: Add the account to be migrated.
In the portal, click “quick add item” and add each account you want to migrate from Google Workspace to Office 365.
Another option is to upload a CSV file containing the email addresses for all users in scope and their source data. If using this approach, verify that your destination accounts match your source accounts from Google.
Finally, at this stage, make sure that your vanity domain has been verified in your Microsoft 365 portal. If you have to use the ‘onmicrosoft.com’ domain for any reason, your target accounts also need to use the onmicrosoft.com address instead.
Once done, you will have the accounts listed as below:

Step 12: Verify credentials.
- In the portal, select all the accounts.
- Within the action menu, select “verify credentials.”

- Click “OK.”
- Once validated after 5-10 minutes, you will see “completed (verification).”

You are now ready to start the migration!
Step 13: Start the migration.
- Select all the users that will have their accounts migrated.
- Within the action menu, select “pre-stage migration.”

- You will need to purchase BitTitan licenses in order to move forward.
Important Note: Confirm that you are buying the correct BitTitan licenses; BitTitan "regular" email licenses are limited to 100GB in data transfers, so your organization will need to buy a bundle license if the user account goes over this data limit. If the Google account is close to 100GB in size, BEMO recommends getting a bundle license.
- After purchasing the licenses, the following screen will display:
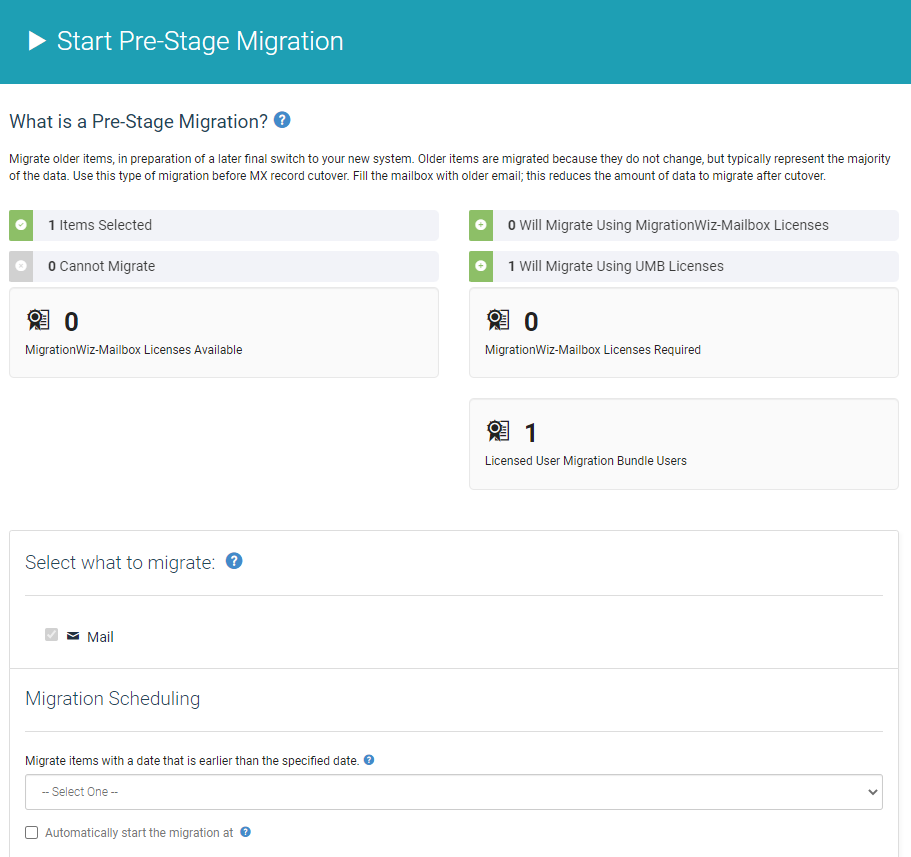
- Click “start migration.”
- Depending on the size of your mailboxes, it can take from a few hours up to weeks to complete. A good benchmark is to use an average of 2GB transferred per day.
Once the migration is done, you will see the following screen:

Step 14: Complete cutover activities.
- Run a full synchronization. In BitTitan, run a full synchronization, this will migrate all new emails and other objects (calendars, contacts, and so forth) that were not migrated during the initial synchronization.

- Complete cutover steps: domain verification and DNS update.
- Go to https://admin.microsoft.com.
- Log in.
- Click “settings.”
- Click “domains.”
- Complete the setup for the vanity domain by adding the requested DNS records.

Once done, the domain has been added, and DNS updates have been completed.
NOTE: At this stage, emails are being redirected to Office 365 and Google is no longer the email provider for this domain. However, the migration is not totally completed!
Step 15: Run a delta sync.
The final step is to run another email sync in order to catch any emails that may have been received by Google Workspace during the DNS cutover.
This step will make sure that you are not missing any emails sent during the last two hours.
- Go back to the BitTitan portal.
- Select all the users that will have their account migrated.
- Within the action menu, select “full migration.”

One last thing! You will need to complete the following steps to make your Office 365 tenant secure:
- Test that you are receiving emails via your Office 365 tenant.
- Enable SSPR.
- Enable Azure security defaults.
- Enable DKIM and DMARC.
Step 16: Celebrate!
OK, so we lied! There are actually 16 steps to successfully migrate from Gmail to Office 365.
Make sure to take some time to celebrate what your organization has accomplished by migrating to Office 365. Throw a party, kick up your feet, or just enjoy the satisfaction of a job well done. Whatever you choose, just make sure to mark the accomplishment of unlocking a new set of productivity and collaboration tools for your organization's next chapter.
Want Expert Assistance with Your Google Workspace Migration?
If the above steps still seem a bit complicated or if your team just doesn’t have the time, don’t worry—we get it.
The experts at BEMO can also handle every step of the process for you! Just book a meeting with us, and we'll give you all the specifics you need to know about what a BEMO migration looks like without even speaking with anyone.
Want to learn more about performing your own migration and how BEMO can be the right partner in your corner? Contact our team!

Sign up & receive BEMO content right to your inbox.

Leave us a comment!